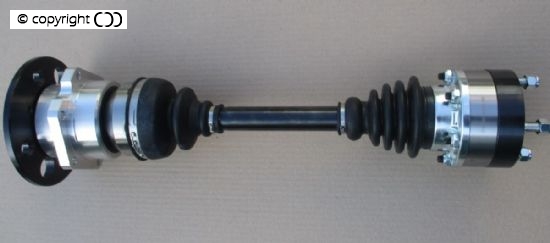
FITTING INSTRUCTIONS FOR CV DRIVESHAFTS
Application: TR STAG & INNSBRUCK
· Follow recognised safe working practices when working on the car.
· Refer to a recognised workshop manual if necessary.
· If in doubt don’t do it. Ring your supplier for advice.
Please note: VERY IMPORTANT
1) Some telescopic dampers may have more rebound / droop travel than the original lever arm type.
When fitting these shafts and when fitted do not allow the max droop to exceed 440 mm measured from the centre of the hub / shaft to the return edge of the wheel arch.
2) Many of these cars have been repaired over the years, so check the shaft fit dimension; this is the distance from the face of the diff flange to the face of the trailing arm at normal ride height,
400 mm for TR & 475mm for Stag / Innsbruck.
Jack up the rear of the car and support on axle stands under the chassis / rear sub frame.
Use a separate jack under the trailing arm to raise and lower it.
Stag and Innsbruck cars have more room in which to work so the task is easier.
On receiving your drive shafts remove the outer nut and washer and while holding the alloy hub and the drive flange together pull it off the CV joint spline. Place on a clean surface, flange uppermost.
The driveshaft is provided assembled and all joints preloaded with grease, so no need to dismantle.
As TRs have less room and are more difficult, this is the procedure:
Follow recommended procedures to remove the standard driveshaft / hub assemblies.
Wire brush & clean the inside of the trailing arm so no dirt will fall onto the spline / hub assembly.
Various exhaust systems and dampers may have been fitted over the life of your car; so there may be slightly different procedures necessary.
The lever arm damper on the near side will have to be detached from its’ chassis mounting (does depend on fuel pipe positions). Telescopic dampers also may have to be disconnected from the trailing arm. Stag / Innsbruck have telescopic which can remain in place.
The driveshaft goes into the hub from the diff side and then move back to engage the diff flange bolts, engage the nuts to hold in place.
Raise the trailing arm and reattach the damper, then raise as far as possible towards the normal ride height of the car (do not lift off the main vehicle supports)
Align the CV Joint splined shaft in the centre of the hub and engage the hub assembly with the splines and the hub studs. Do up the 6 off hub studs to 16 lbs ft. Be careful here; the thread of these studs are known to be ‘suspect’. If you have any doubt about their security consider fitting the 3/8 unc stud kit.
Tighten the diff flange bolts/nuts. ( 35 lbs ft)
Now place the washer and the M22 PLAIN nut on the splined shaft and nip up. Rotate the hub and listen for any scraping noise; you are looking for any fouling of the CV boot gaiter clip on the inner of the trailing arm housing. It will be a band 69 to 75 mm from the trailing arm face.
If all is ok then remove the plain M22 nut and replace with the locking M22 nut. Tighten as much as possible.
Complete and check all operations.
Replace the drum and road wheel.
When the car is on the ground engage the hand brake and chock the wheels.
Tighten the driveshaft nut ( 32 mm AF) to 290 Nm or 215 lb ft. If your torque wrench will not go this high then it is ok to tighten to 120 lb ft, and drive a short distance to a workshop to have them tightened to the full torque setting.
The tightness of fasteners should be checked after 100 miles or so. And subsequently at the service intervals.
The torque setting of the inner CV’s 6 sandwich M8 bolts is 40 Nm.
NB: Triumph inner diff flange bolts are renowned for working loose.
To keep your shafts looking good and to prevent corrosion spray, brush, wipe ACF50 all over the metal surfaces.